If you’re developing an app it’s highly likely you’ll have to send automated transactional emails; confirmation emails, reset password, social notifications etc.
I’ve had to do this a bunch of times recently so thought I’d document it for other developers.
Assumptions
You have a Rails project and you want to send an email when a certain event occurs. Lets assume that once a record is created you want to send an email notification to yourself.
If you don’t have a Rails project yet, learn how to create your first Rails app here.
Sign up for Mailgun
Mailgun is a developer tool and API for sending transactional emails. You get 10,000 emails per month for free.
Create an account and add a subdomain to start (you can add your own custom domain later).
Ruby on Rails Action Mailer
Action Mailer enables you to send emails from your application using mailer classes and views.
Generate your mailer by typing this in Terminal:
rails g mailer model_mailer new_record_notificationmodel_mailer is the name of the mailer and new_record_notifcation is the method. You can name these anything you like, whatever makes sense for your project, and you can add more methods later.
Notice this creates a bunch of files.
model\_mailer.rb is where the logic will go for sending email and new\_record\_notification.text.erb is the content of the email that will be sent.
Configure your development environment
This is where you put your Mailgun settings.
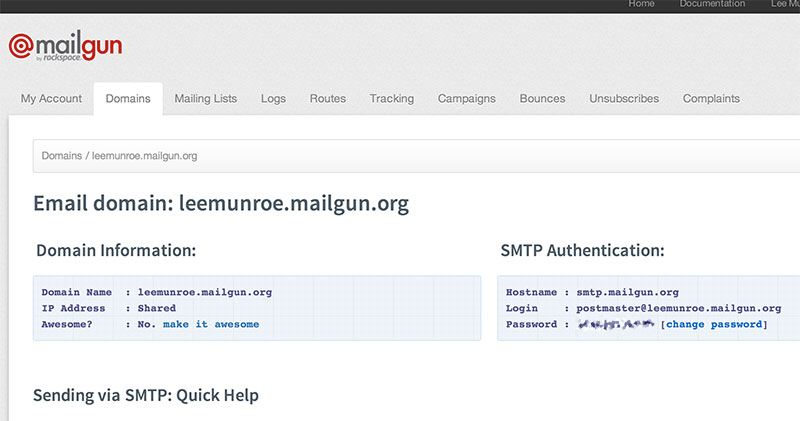
Log in to Mailgun and click on your subdomain (or domain) to find your SMTP settings.
Now open up config/environments/development.rb
There should already be some default settings here. Add the following:
config.action_mailer.delivery_method = :smtp
config.action_mailer.smtp_settings = {
  :authentication => :plain,
  :address => "smtp.mailgun.org",
  :port => 587,
  :domain => "MYDOMAIN.mailgun.org",
  :user_name => "[email protected]",
  :password => "MYPASSWORD"
}
Be sure to replace MYDOMAIN with your Mailgun subdomain.
Add logic to send the emails
Open up app/mailers/model\_mailer.rb and change the default from email:
default from: "[email protected]"Then define your new_record_notification method:
def new_record_notification(record)
  @record = record
  mail to: "[email protected]", subject: "Success! You did it."
end
Couple of things to note above:
- The "to:" is the email recipient. This could be you or a user, depending on the use case.
- We're passing the "record" model. This will allow us to use those values in the email content if we wish.
Create a view template (content) for the email
Open up app/views/model\_mailer/new\_record\_notification.text.erb
In this view we add the body content of our email. Remember we passed the record model so you can use it for some values if you like.
Hi,

A new record has been added: <%= @record.name %>

Thanks
Send the email
Last thing to do is to call the email method from your controller.
Whenever you want to send this email, in this case when a new record is created, call this mailer method:
ModelMailer.new_record_notification(@record).deliverTo clarify, your full create action might look something like this:
def create
  @record = Record.new

  if @record.save
    ModelMailer.new_record_notification(@record).deliver
    redirect_to @record
  end
end
All done
Now you can use Mailgun’s logs to check sent and delivered emails. When you’re ready, add your custom domain to Mailgun and configure your action mailer settings in production.rb
You should also read the following:
Receive more design content like this to your inbox
I promise not to spam you. No more than one email per week.